
Responsive Forms – 4 – Processing Open Records
Online Forms > Responsive Forms > Open Records tab
Video Outline
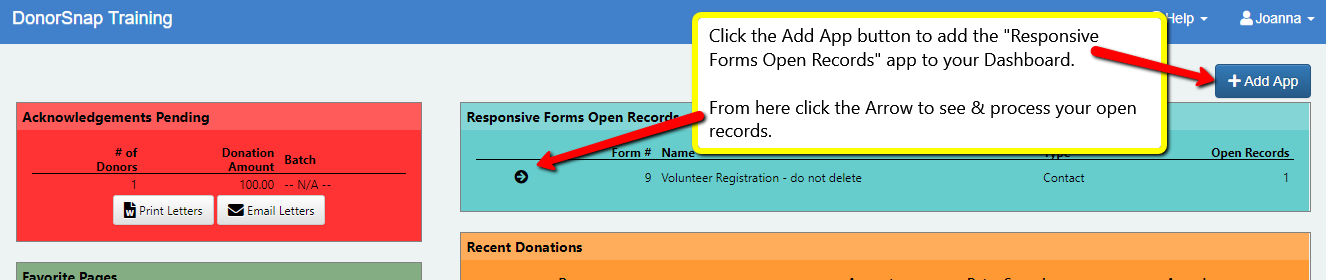
- Add the Open Records app to your dashboard to alert you to open records when you log in to DonorSnap
- Link a form submission to an existing record in your database to avoid creating a duplicate contact record
- See what currently exists in DonorSnap for a contact
- Load a record into your database
Add the Open Records App to your Dashboard
Auto-Link Contacts by Email
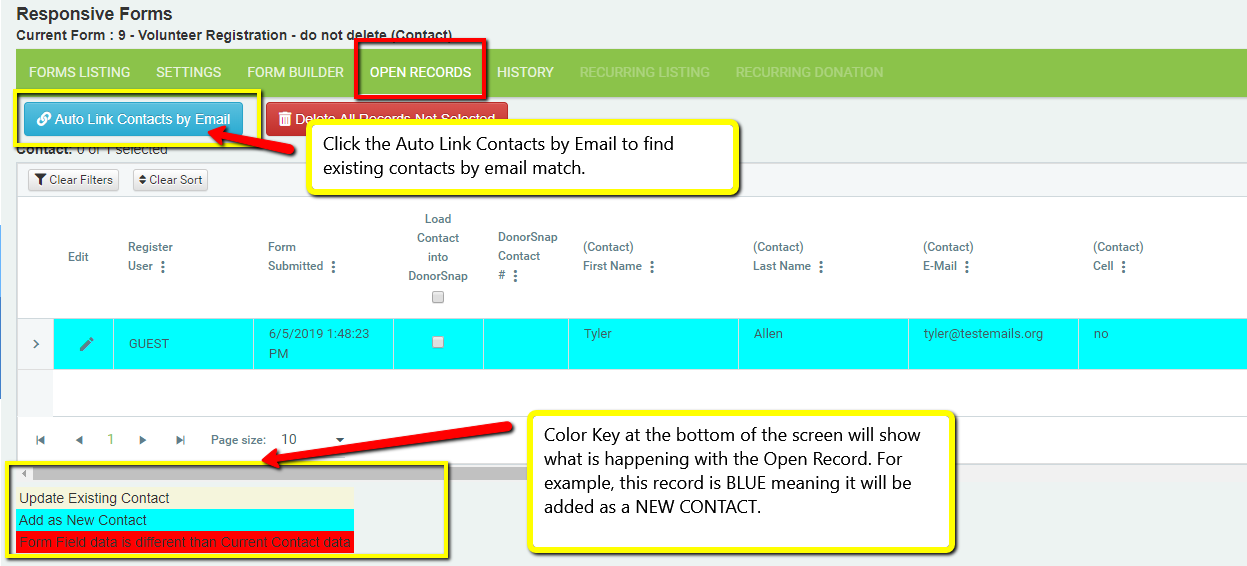
Clicking the “Auto Link Contacts by Email” button will automatically check your database to see if a contact with the same email address already exists. If a matching email address is found in the PersonaEmail, Email1, or Email2 fields, then the record will automatically be linked with that existing contact.
DonorSnap will first search the Email1 field and link the record to the first match found. If multiple contacts share an email address, the oldest contact record will be linked to it. If no match is found in the Email1 field, the Email2 field will be searched for an existing match.
If using the Persona feature and you have included the DonationPersona, InteractionPersona, or VolunteerPersona field on your form, DonorSnap will first check for email matches using the PersonaEmail field. If none is found, it will search the Email1 then the Email2 fields.

Important: Make sure to scroll to the right to make sure you are not overwriting any existing fields that you might want to keep. Look for the red highlighted cells, and then click the edit button to review those records if needed.
If no existing contact is found:
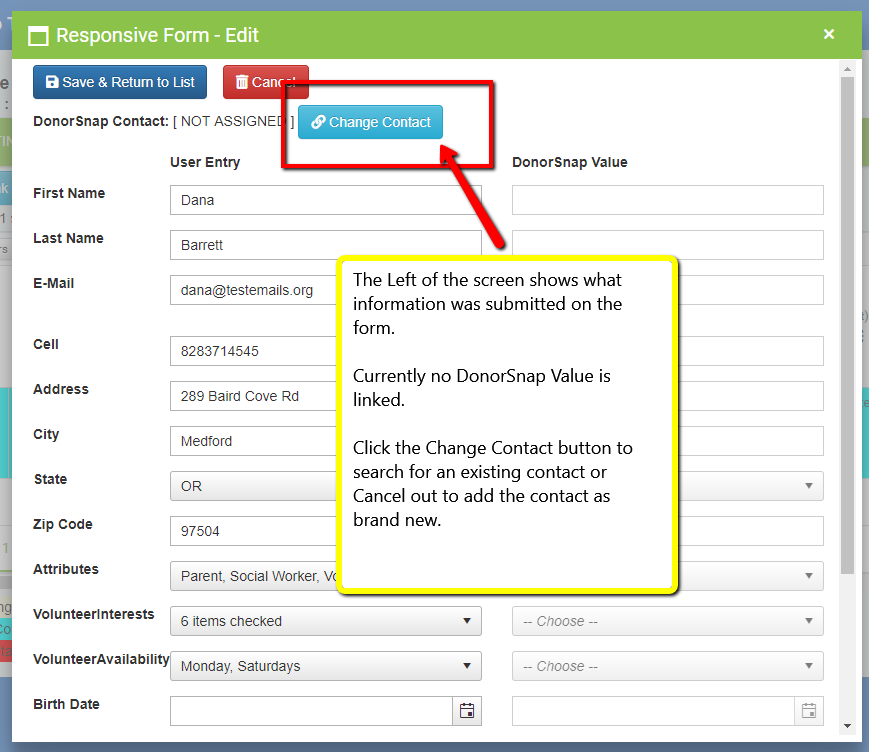
If no existing contact is found, click the Edit (pencil icon to the left).
Click Change Contact to search for an existing Contact by Name or Email field.
OR when you search and get no results, that means the contact does not exist in your database. Cancel out of the edit screen and click the Load Contact button to add as a New contact.
Attaching a Form Submission to an Existing Contact
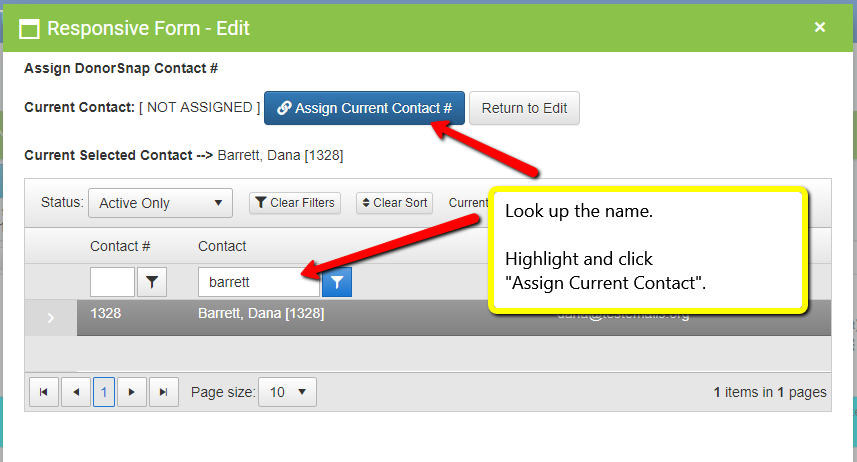
Click the Edit (pencil icon) next to the Open Record. And click the Change Contact button.
Search for the name. Highlight the name you want to attach the form to and click Assign Current Contact #.
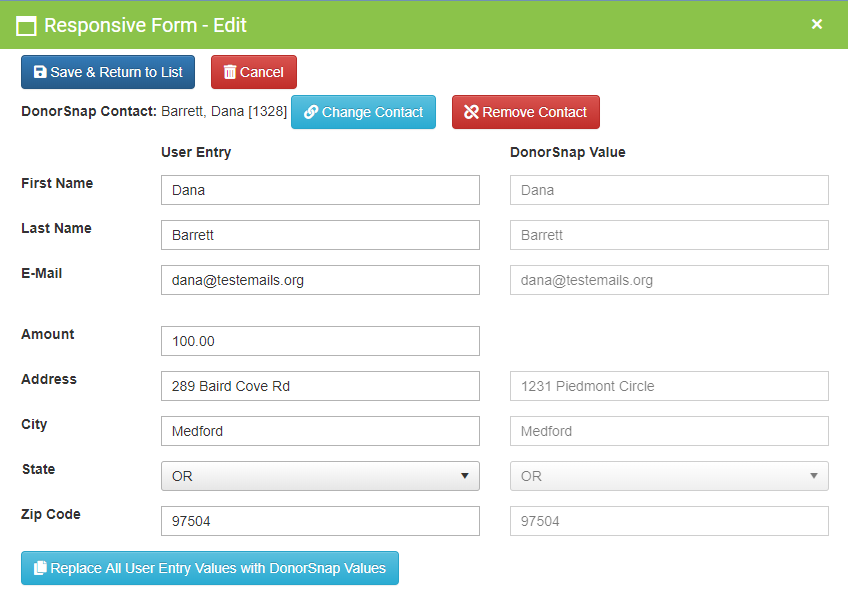
Use the comparison page to look through the information submitted on the form, and the information currently in the database.
What is on the LEFT, the User Entry, will be the information submitted to the database.
And note that if what is on the left is different than what’s currently in the database, what THEY submitted on the form, will over-write the existing information.
Now, we hope that information will be the same. In a perfect world.
But look at this example. What if Dana has moved recently? She submitted an address different than what’s currently in the database?
What do you do? You have options….
1 – Leave as is. Assume that Dana submitted her New and updated information (whether that’s email/phone/address, etc. ) and that what’s in DonorSnap needs to be updated.
2 – Click the Replace All User Entry Values button at the bottom of the page to have what’s currently In DonorSnap, to overwrite what was submitted on the form (We’d recommend making a quick phone call to the Contact if it’s something different like phone number/address).
This can be extremely useful however, if you have fields embedded in your form for Attributes or Interests. Maybe this form labels Dana as a “Volunteer” under Attributes, but your existing Attributes has Dana listed as Board Member, Parent, Volunteer, and Events committee. You don’t want to lose all that information!
3 – Honestly, piece of paper. Write down the differing information and then fix it manually in their site. Such as they submit a different email than the one in your program. You’ll want to add the NEW email as “Email 2” later after you call them and verify that both are still correct.
Load Contacts

Whether the open record is BLUE (New Contact) or White (updating an existing contact), the final step is to click the Load check-box.
Then click the Blue Load button at the top.
Any records Not-selected for whatever your reason of not wanting them to load, there will also be a Green “Delete all records not selected” button available (not pictured here).
Next Steps:
- Forms Listing
- Settings
- Form Builder
- Open Records – You are here
- History
- Recurring Listing
- Recurring Donation