Online Forms – Payment Amount Dropdown Link
Online Forms > Payment Amount/Dropdown Link
For DonorSnap’s online forms, you can create drop-down choices or radio buttons for pre-defined donation amounts, membership levels, sponsorship levels, number of tickets and their values, etc.
Here is a video explaining how to add values to your drop-down choices:
For help creating a shopping cart like experience using Responsive Forms, view the Form Totals video page.
Adding Fields to your Database
First, you must add the fields to your database that you want to include in your form (remember anything a user completes on your form goes directly in to your DonorSnap database, so in order to put it on your form, it has to already be in your database).
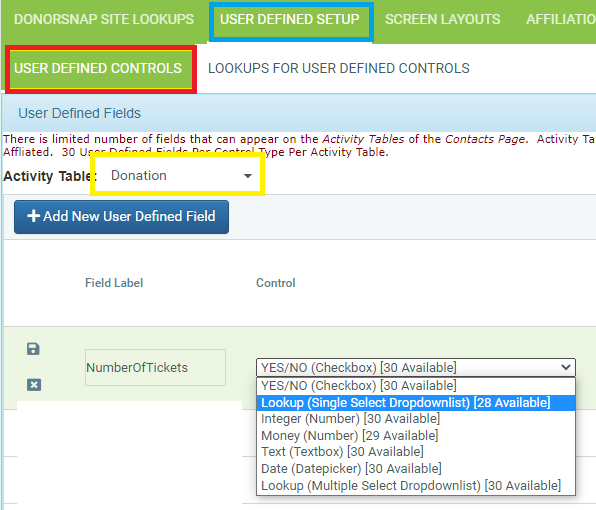
Maintenance > Site Setup > Field & Screen Customization > User Defined Setup
Consider the Table at the top, of where you are adding the field (Contact tab, Donation tab, Interaction tab, etc., depending on what type of form you are creating).
Add the New Field. For this example, we’ll add a “Number of Tickets” field.

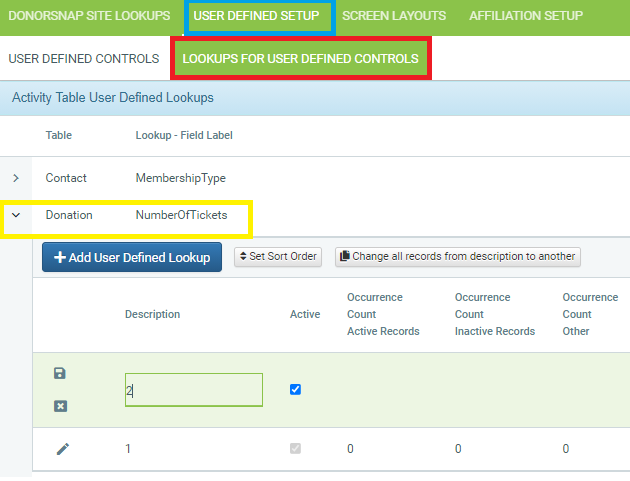
Next, add the options under the field. (For this example we’re adding 1-2-3, etc, to the drop-down). You will add your predefined Donation amounts, Sponsorship levels, etc.
Click the Lookups for User Defined Controls tab above, find your newly added field. Click the arrow on the left to expand the drop-down and add your options.

*Note* that you can also Set the Sort Order of your options. By default it will sort them Alpha-Numerically, which might not be the order you want them displayed on your form. For example, you might want Sponsorship Levels going lowest to highest by value, not the Name of the level. Click the Set Sort Order button underneath the name of your field.
Adding the Payment Amount
Once you have added your field (or if you already have a field in your database), you need to create the associated Payment Amounts in to the form (so when they click “2” it automatically inserts the value of two tickets).
Online Forms > Payment Amount Dropdown Link
In the Types field at the top, change accordingly, most likely to User Defined Lookups for the field you’ve just added.
Find your field. Click the arrow to the left to Expand the options. Edit each one with their respective value.

Add the Field to your Form and Link to Amount
Now that you have your field created, insert the field in to your form in the location where you want it to go.
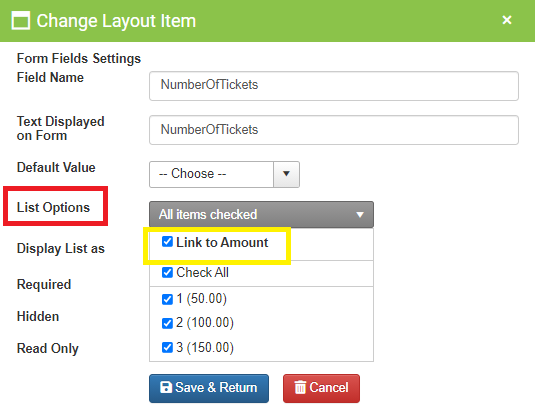
Click the Gear icon on the left of your field.
In the List Options select Link to Amount and the associated dollar amounts will appear. (*Note they will not show with dollar signs in this list, but they will on your form).

